
Stress Gradient
Get the stress gradient away from a stress concentration in FEMAP - the opening stress along a crack path from the hot spot, ready for a crack growth stress distribution (AFGROW, NASGRO) or a notch fatigue check.
What it does
- Finds the hot spot: the surface node with the highest max principal stress in the elements you select, or a node you pick.
- Puts the crack plane through it, normal to the max principal direction (or to an axis of a coordinate system you pick).
- Follows a path in that plane and reports, point by point, the stress that opens the crack, the max principal, how far the max principal turns away from the crack-plane normal, and von Mises.
- Paths: along the surface (the default - the crack plane traced across the surface from the hot spot), into the part (solids: straight in along the steepest drop; plates: through the thickness), straight to a node, or through nodes you pick.
- Works on solid meshes (tet, wedge, hex) and on plate meshes (top, bottom, mid or whichever surface is hotter).
- Writes an Excel workbook with the table, a chart of the normalised gradient and a crack-growth sheet (x, x/t, stress, stress / reference), and creates a coordinate system at the hot spot (x along the path, z normal to the crack plane), points and a curve along the path, and optionally XY functions to plot in FEMAP.
- Flags a mesh too coarse for a reliable gradient, and a max principal that turns away from the crack plane (the crack may turn).
When you want it
- Building the stress distribution for a crack growth model from a FEM stress result, instead of reading contour plots by hand.
- Checking how fast the stress falls off at a hole, fillet or notch, and whether the mesh resolves it.
How to use it
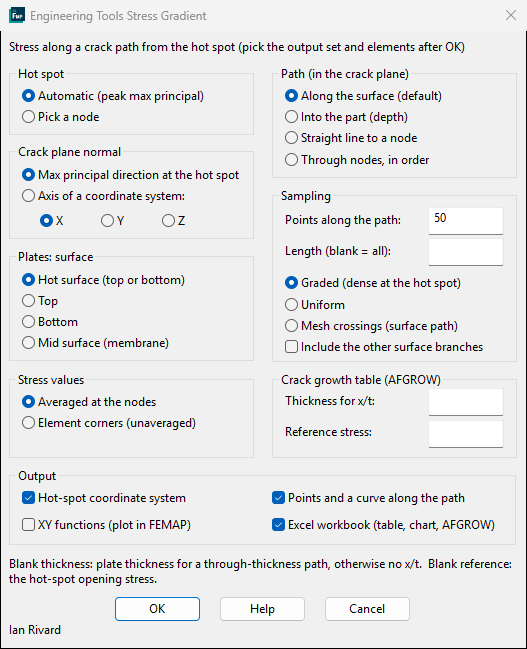
- Solve with element corner stresses (STRESS(CORNER), or BILIN for plates) so the peak is not under-read.
- Run the tool, choose the options, then pick the output set and the elements around the stress concentration (all plates or all solids).
- Pick the extra nodes or the coordinate system if the options you chose ask for them.
- Read the summary and any checks in the Messages window; the workbook opens when it is done.
Example
A plate with a hole under axial load, default settings: the opening stress along the surface path, from the peak at the edge of the hole out to the edge of the selection. It falls to about a third of the peak, the classic plate-with-a-hole decay.
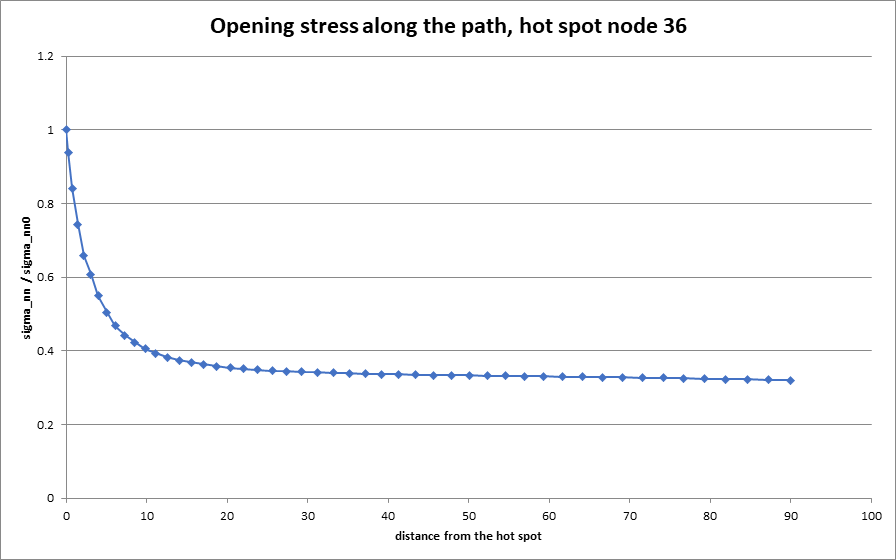
Try it on the example model, a plate with a hole under axial load: Stress_Gradient_Coupon.dat.7z (Nastran deck).
Tips
- For a crack growing into a solid from the surface, use the into-the-part path. If the surface path from a hot spot in a bore is much shallower than the drop into the part, the tool says so.
- Enter the thickness to get x/t, and a reference stress (for example the nominal stress your spectrum is scaled to) to keep the stress concentration in the crack-growth sheet; left blank, the sheet is normalised by the hot-spot stress.
- Select a region that covers the whole path you want; the path stops at the edge of the selection.
- Averaged nodal values give a smooth curve; element corner values show how much the elements disagree, a quick mesh-quality check.
- Needs FEMAP 2020.1 or later.
Related tools
- Measure - the wall or layer thickness at a hole, for x/t
- Results by Group to Excel